Upload CSS Styles to WordPress
CSS styles have been designed for the frontend part of the website. Changing style means changing color, font, and other elements. That’s why you need to know how to customize CSS styles in the website theme. Before uploading styles on the website, you need to register the CSS file in functions.php of your theme.
If you want to add an additional CSS file make sure to register it in functions.php first using wp_register_style() functions:
|
1
2
3
|
<?phpwp_register_style( $handle, $src, $deps, $ver, $media );?> |
Pay attention to the procedure of registering CSS styles.
|
1
2
3
4
5
6
7
8
9
10
11
12
|
<?php // wp_register_style() examplewp_register_style( 'my-bootstrap-extension', // handle name get_template_directory_uri() . '/css/my-bootstrap-extension.css', // the URL of the stylesheet array( 'bootstrap-main' ), // an array of dependent styles '1.2', // version number 'screen', // CSS media type); ?> |
The example above with show you how to load the CSS file to your theme’s <head>. Here you will need the wp_enqueue_style() function:
|
1
2
3
|
<?phpwp_enqueue_style( $handle, $src, $deps, $ver, $media );?> |
Note that wp_enqueue_style() can be used in two different ways:
|
1
2
3
4
5
6
7
8
9
10
11
12
13
14
15
|
<?php // if we registered the style before:wp_enqueue_style( 'my-bootstrap-extension' ); // if we didn't register it, we HAVE to set the $src parameter!wp_enqueue_style( 'my-bootstrap-extension', get_template_directory_uri() . '/css/my-bootstrap-extension.css', array( 'bootstrap-main' ), null, // example of no version number... // ...and no CSS media type); ?> |
The wp_enqueue_style() applicability is limited. That’s why you need to use so-called actions to load scripts and styles:
- wp_enqueue_scripts – for the frontend;
- admin_enqueue_scripts – for pages and the dashboard;
- login_enqueue_scripts – for the login page.
The pattern of working with the CSS file:
|
1
2
3
4
5
6
7
8
9
10
11
12
13
14
15
16
17
18
19
20
21
|
<?php // load css into the website's front-endfunction mytheme_enqueue_style() { wp_enqueue_style( 'mytheme-style', get_stylesheet_uri() ); }add_action( 'wp_enqueue_scripts', 'mytheme_enqueue_style' ); // load css into the admin pagesfunction mytheme_enqueue_options_style() { wp_enqueue_style( 'mytheme-options-style', get_template_directory_uri() . '/css/admin.css' ); }add_action( 'admin_enqueue_scripts', 'mytheme_enqueue_options_style' ); // load css into the login pagefunction mytheme_enqueue_login_style() { wp_enqueue_style( 'mytheme-options-style', get_template_directory_uri() . '/css/login.css' ); }add_action( 'login_enqueue_scripts', 'mytheme_enqueue_login_style' ); ?> |
How to Create a Custom CSS File in WordPress Dashboard Using Woody ad snippets
Registering and adding all the necessary code takes time and requires some knowledge. That’s why if there’s an alternative to avoid registering the CSS file in functions.php you should use it. The great way is to add code snippets using Woody ad snippets.
One of the benefits here is that each time you update the theme, your unique settings remain untouched. That is possible because Woody ad snippets will create an additional folder for all the changes made, and the system updates won’t appear there. To start working with the plugin, download Woody ad snippets from the WordPress repository. Install the plugin and activate it.
Change properties of the existing class in the source code using the custom CSS file and create a snippet in Woody. Open the dashboard and go to the plugin settings:
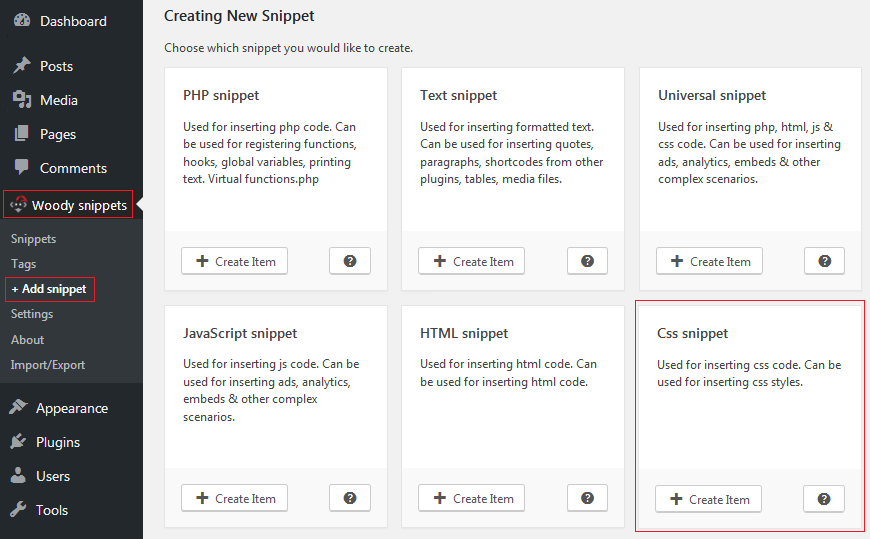
Woody snippets => +Add snippet => choose CSS snippet. Press +Create Item to create a snippet.

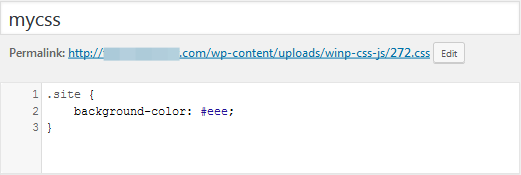
Now you see a snippet editor. Add a title – that’s going to be the snippet’s name. Enter the necessary code to the input field.
Let’s see how it works on practice. For example, you want to change the background color from white to grey. First, study the background color element using the admin console and copy the fragment of the code responsible for the background’s CSS styles. Click <div id=”page” class “site”>. Check the right window for three lines of the code responsible for the background color. Copy them.
Replace the digital RGB model of the white color #fff with the code for the grey color – #еее. You should get something like this:
.site {
    background-color: #eee;
}
Add this value to the snippet editor and save.

Click Automatic insertion in the Where to execute the code field. Select Footer in the drop-down menu.
To re-define (change) CSS class properties, you should edit the current CSS file. Or you can do so in another CSS file that will be loaded after your theme’s CSS file (below the corresponding code). That’s why you need to select Footer in Insertion location.
Pay attention to the snippet list – it shows that the snippet is running.

Check whether the background color has been changed from white to grey.

Conclusion
We’ve discussed how to create the CSS file so no theme updates will affect your custom settings. We recommend using Woody ad snippets. Once you add snippets, the plugin will create a separate folder for them. Besides, if you want to edit the website appearance and change the code you won’t have to register the CSS file in functions.php.
